sadp basics
How to use the SADP tool (2026)
Use Hikvision SADP on your LAN: detect devices, activate, change IP, batch config, password workflows, troubleshooting, mistakes to avoid, and FAQs.
The SADP (Search Active Device Protocol) tool is a core utility for commissioning Hikvision systems on a local network. The global video surveillance market is large and growing; Hikvision holds a significant share—so knowing SADP is a practical skill for installers and IT staff.
This site is independent. Use our SADP download page for Windows and Mac zip files and links to Hikvision HiTools; confirm builds against the portal when your policy requires it.
Table of contents
How to Use SADP Tool to Detect Hikvision Devices
Step 1: Network connection setup
Before launching SADP, put your computer and Hikvision devices on the same LAN (same broadcast domain for discovery).
Network requirements:
- Same network segment (e.g. both on
192.168.1.x) unless you use advanced routing (see VLANs and discovery) - Working Ethernet or Wi-Fi (Wi‑Fi client isolation often breaks discovery)
- DHCP on the router if you rely on automatic addressing
Step 2: Launch SADP Tool as administrator (Windows)
Right-click the SADP shortcut and choose Run as administrator so the tool can access the network stack as intended on many Windows builds.
Step 3: Allow network access
When Windows Firewall or security software prompts you, allow access on private networks so multicast/UDP discovery can run. See Windows Firewall blocking SADP.
Step 4: Automatic network scan
After launch, SADP rescans the network on a timer. Hikvision’s own materials describe typical refresh behaviour (exact timing can vary by version):
- New devices often appear within ~15 seconds of coming online
- Stale entries can clear after disconnect (timing varies)
- Use Refresh for an immediate pass
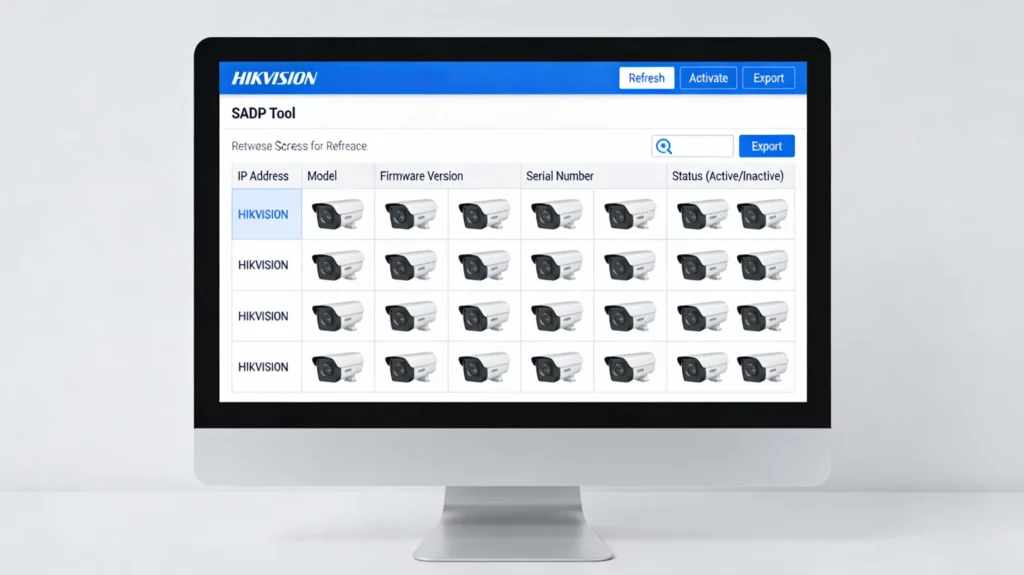
Understanding the device list
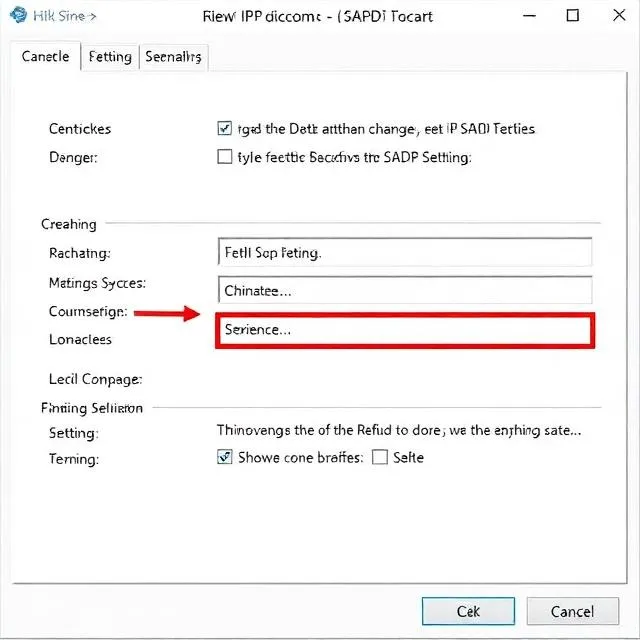
Typical columns include:
| Column | Information |
|---|---|
| Device type | Model (e.g. DS-2CD2042WD-I) |
| IP address | Current IPv4 |
| Ports | HTTP / SDK-style ports (defaults vary by era) |
| Status | Active vs Inactive (needs activation) |
| MAC address | Hardware ID |
| Gateway / mask | Routing context |
| Firmware | Build on device |
| Serial number | Unique ID |
The list auto-refreshes on a schedule; use Refresh when you need a quick update during large jobs.
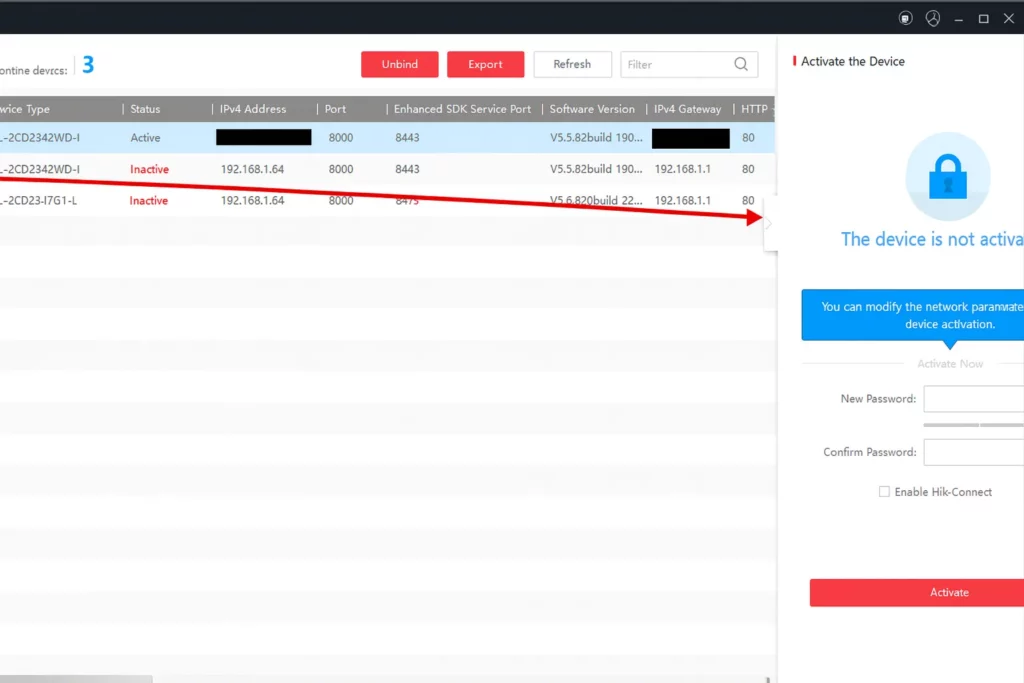
How to Use SADP Tool to Activate a New Device
Many new Hikvision devices must be activated before full use—Inactive in SADP means you need to set an admin password through the supported workflow.
Industry context
Weak and reused passwords remain a real problem in every industry. Activation is your first chance to enforce strong, unique credentials and recovery options (where supported).
Activation steps
- Find the Inactive device in SADP
- Select its row
- Set a strong admin password (long, mixed character types, not guessable personal data)
- Confirm the password
- Click Activate and wait a few seconds for status to flip to Active
- If offered, export GUID / set security questions for supported recovery paths
For a dedicated walkthrough, see Activate Hikvision NVR step by step and Activating Hikvision devices with SADP.
How to Use SADP Tool to Change IP Address
Static addressing is common on professional CCTV VLANs; DHCP can work for simple LANs if leases are stable.
Common IP configuration issues
Wrong subnet is one of the most common reasons SADP or the browser “loses” a device after changes. Plan old vs new IP before you click save.
IP address modification steps
- Select the device (often must be Active—follow best practice: activate first)
- Open network / modify (wording depends on version)
- Enter the admin password when prompted
- Choose static or DHCP:
- Static (typical for CCTV): IP in range, mask (often
255.255.255.0), gateway, DNS if shown - DHCP: only when you accept changing addresses or use reservations
- Static (typical for CCTV): IP in range, mask (often
- Click Modify / Save
- Wait for the list to show the new IP; test with ping or the web UI
Full article: How to change IP with SADP.
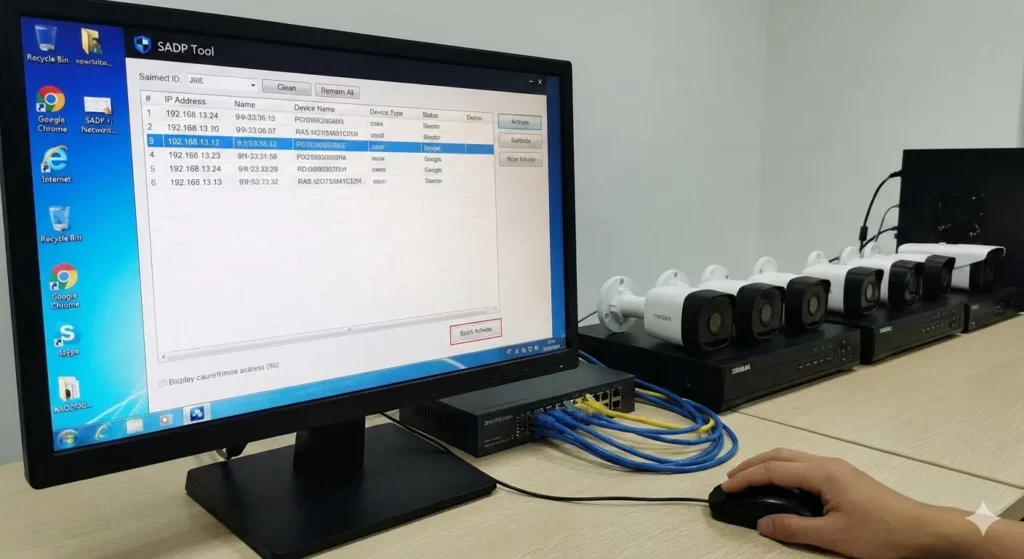
How to Use SADP Tool for Multiple Devices at Once
Batch tools save time on large jobs when passwords and addressing plans align.
Batch configuration process
- Multi-select devices (e.g. Ctrl-click) where the UI allows
- Enable batch modify / batch network options if present
- Set a starting IP, increment, mask, and gateway for the range
- Enter the admin password (often must match across selected units—confirm for your batch)
- Apply and wait for confirmations
Capabilities differ by SADP build and firmware—verify on site for your mix of models.
How to Use SADP Tool to Reset Password
Method 1: GUID / export file (many current lines)
- Select the device → Forgot password / export workflow
- Generate the XML / key file per Hikvision’s current method
- Work only through authorised support channels with proof of ownership
- Import the returned file in SADP and set a new password
Read password reset, ethics, and support before attempting resets on equipment you do not own.
Method 2: Security questions (if configured)
If questions were stored during setup, use the Forgot password path and answer them, then set a new password immediately.
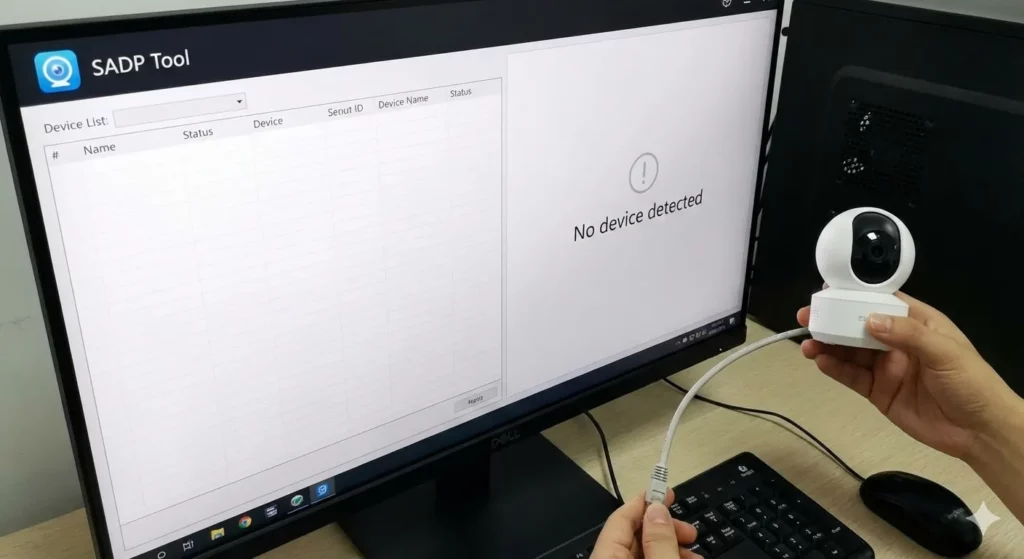
How to Use SADP Tool When Device Is Not Detected
Troubleshooting checklist
1. Same subnet path
- Check the PC IP (
ipconfig/ OS settings) - Compare to the camera/NVR default or current IP
- Add a temporary static IP on the PC if you must reach another segment
2. Firewall
- Allow SADP on private networks
- Test briefly without aggressive third-party suites if policy allows
3. Physical layer
- Cable, PoE budget, link LEDs
- Try another cable/port
4. Restart SADP
- Fully quit and reopen as administrator (Windows)
5. Reboot the device
- Power cycle, wait for full boot, Refresh in SADP
6. Capture driver (Windows nuance)
Some documentation and forums refer to Npcap / legacy WinPcap-style drivers for certain networking tools. Follow Hikvision’s current release notes for your SADP build rather than guessing.
7. Current SADP build
Install the latest supported package from HiTools—see the SADP download page linked at the top of this guide.
More: SADP not finding cameras, inactive devices.
How to Use SADP Tool After IP Change
Post-configuration access
- Open a modern browser
- Browse to
http://YOUR.IP.HERE(usehttps://if the device enforces TLS) - Log in with your admin user and activation password
- Complete any first-run wizard (recording, time, security)
- Add the camera to an NVR using the new IP if needed
Common Mistakes When Using SADP Tool
1. Different network subnet
Symptom: Nothing appears or device vanishes after IP change.
Fix: Align PC and device on a reachable path; document every change.
2. Weak passwords
Symptom: Easy-to-guess credentials.
Fix: Long, unique passwords per device; store in a password manager.
3. Firewall blocking SADP
Symptom: Empty list despite good cabling.
Fix: Allow SADP; see the Windows Firewall article linked in the detection section above.
4. Outdated SADP
Symptom: Missing devices or odd errors.
Fix: Update from official HiTools via the download page linked at the top of this guide.
5. Skipping the manual
Default IPs and activation rules vary by model.
6. Poor cable management
Indirect but real: damaged outdoor runs cause “mystery” offline gear.
7. No documentation
Keep a secure sheet: hostname/location, IP, MAC, serial, firmware, credential storage policy.
Best Practices for Using SADP Tool
- Activate first on new/reset gear (see the NVR activation guide linked in the activation section above)
- Use static IPs (or DHCP reservations) for production CCTV
- Label cameras and patch panels
- Document everything in a controlled store
- Segment CCTV from office LAN where possible (segmenting cameras)
- Maintain firmware from official sources only
- Batch only when models/passwords/plan truly match
- Test web UI, time, recording, and motion after changes
Frequently Asked Questions
Can I use SADP Tool without internet?
Yes for LAN work. Discovery and edits happen on the local network. You only need the internet to download the installer (or for vendor support / cloud workflows outside SADP).
Do I need to activate before changing IP?
Often you can reach some network fields while Inactive, but best practice is activate first so ownership and passwords are locked down before you deploy.
Why does SADP show Inactive?
Common reasons: new device, factory reset, some firmware transitions, or lockouts. Use the Activate workflow or official recovery if locked.
Can SADP configure cameras remotely over the internet?
No. SADP expects a local L2/L3 path. For remote work use VPN into the site LAN, or vendor cloud/mobile products per policy—not raw port-forwarding without hardening.
Is SADP required after initial setup?
Not always, but keep it installed: rediscovering gear after IP moves, new cameras, and support tickets is faster with SADP on a laptop.
Advanced Tips and Statistics
Third-party market reports often cite tens of billions of USD for video surveillance over the next decade and double-digit CAGR—use fresh analyst sources when quoting customers.
Hikvision is a major global vendor; share percentages in analyst decks move year to year—cite the specific report when presenting externally.
Operational benchmarks (batch activations, time saved) depend on your process and hardware—treat marketing round numbers as directional, not guarantees.
Password hygiene: prefer long passphrases or managed secrets; avoid personal trivia.
Networking: static schemes and documented IP plans remain the professional norm on managed CCTV VLANs.
Conclusion
SADP is the on-LAN workhorse for finding, activating, and re-addressing Hikvision equipment. Pair it with good network design, strong passwords, and official downloads.
Next steps
- Open the official SADP download (HiTools links) from the download page linked at the top of this guide
- Plan IP ranges and VLAN paths before you touch production
- Activate, document, and test after every change
Related guides on this site
- Change IP with SADP—linked in the IP section above
- Activate Hikvision NVR (beginners)—linked in the activation section above
- SADP mobile / Hik-Partner context
- Activating devices with SADP—linked in the activation section above
- Editing network parameters
- Password reset ethics—linked in the password reset section above
- SADP not finding cameras—linked in the troubleshooting section above
More on SADP Tool
More articles
- How to Activate a Hikvision IP Camera
Use SADP from HiTools on your LAN to find inactive Hikvision cameras, set an admin password, verify in a browser, then tune IP and security.
- How to Activate Hikvision NVR Step by Step
Activate a Hikvision NVR with SADP: find Inactive, set password & IP, browser login, live view, add cameras on a switch.
- Change camera & NVR IPs with SADP
Change Hikvision camera and NVR IPs with SADP: requirements, step-by-step Modify workflow, DHCP off, verification, common fixes, best practices, and FAQs.
- How to Set Up and Activate a Hikvision DVR
SADP finds inactive Hikvision DVRs on the LAN: activate with a strong password, set IP/DHCP, use the web UI & optional Hik-Connect.