How to Use SADP Tool: Complete Step-by-Step Guide in 2025
The SADP (Search Active Device Protocol) tool is an essential software utility for anyone working with Hikvision surveillance systems. With the video surveillance market reaching $54.42 billion in 2024 and projected to grow to $88.71 billion by 2030, proper device configuration has never been more critical. Hikvision alone commands 23% of the global surveillance camera market share, making SADP Tool one of the most widely used network configuration utilities in the security industry.
How to Use SADP Tool to Detect Hikvision Devices
Step 1: Network Connection Setup
Before launching SADP Tool, ensure your Hikvision devices and computer are connected to the same Local Area Network (LAN). This is critical for device detection.
Network Requirements:
- Same network segment (e.g., both on 192.168.1.x)
- Active Ethernet or Wi-Fi connection
- Router DHCP enabled (if using automatic IP assignment)
Step 2: Launch SADP Tool as Administrator
Right-click the SADP Tool icon and select “Run as Administrator.” This ensures the tool has proper network access permissions to scan your LAN.
Step 3: Allow Network Access
When prompted by Windows Firewall or security software, click “Allow Access.” The tool requires network permissions to communicate with Hikvision devices.
Step 4: Automatic Network Scan
SADP Tool begins scanning automatically upon launch. According to Hikvision’s official documentation:
- New devices appear within 15 seconds of connection
- Inactive devices are removed after 45 seconds of disconnection
- Manual refresh is available via the “Refresh” button for immediate updates
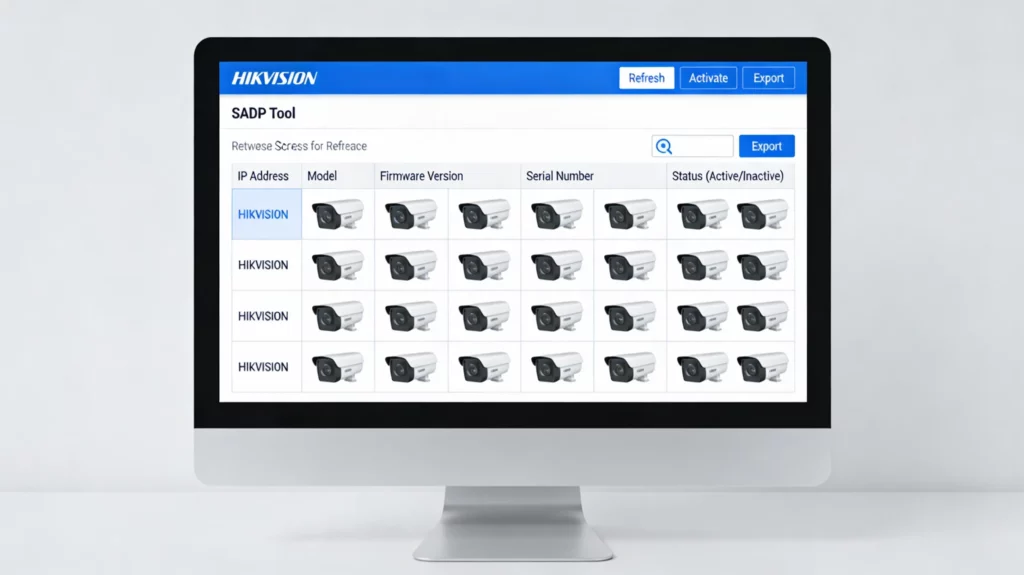
Understanding the Device List
The SADP interface displays critical device information in columns:
| Column | Information Provided |
|---|---|
| Device Type | Model number (e.g., DS-2CD2042WD-I) |
| IP Address | Current network address |
| Port Number | HTTP (default 80) and SDK (default 8000) ports |
| Status | Active (online) or Inactive (needs activation) |
| MAC Address | Hardware identifier |
| Gateway | Router IP address |
| Subnet Mask | Network segmentation (typically 255.255.255.0) |
| Firmware Version | Current software version |
| Serial Number | Unique device identifier |
Pro Tip: The list auto-refreshes every 15 seconds for active devices and every 45 seconds for disconnected devices, saving you time during large installations.
How to Use SADP Tool to Activate a New Device
New Hikvision devices (firmware V3.3.0+ for DVRs, V5.3.0+ for cameras) require activation before use. This security feature prevents unauthorized access.
Industry Context:
According to security experts, 35% of users still use weak passwords (personal details, pet names), with Gen Z (52%) and Millennials (45%) leading this risky trend. Proper device activation is your first defense against security breaches.
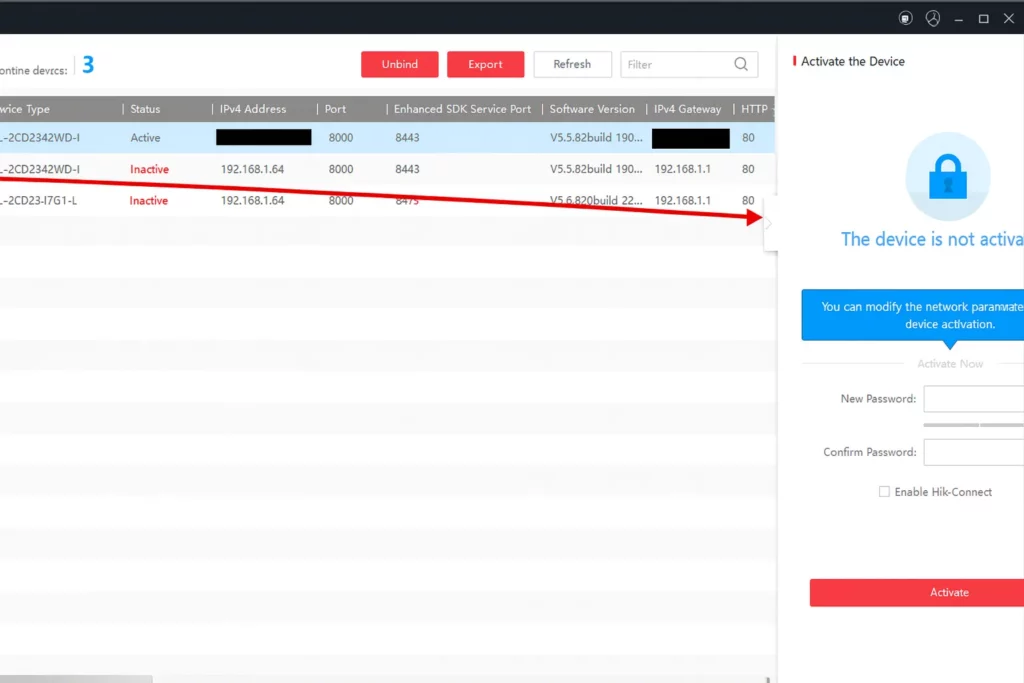
Activation Steps:
- Locate the inactive device in the SADP list (marked as “Inactive” in the Status column)
- Select the device by clicking on its row
- Create a strong administrator password following these 2024 NIST guidelines:
- Minimum 8 characters (NIST requirement, though 16+ characters recommended)
- Include at least 3 of the following: uppercase letters, lowercase letters, numbers, special symbols
- Avoid sequential characters (123, abc)
- Never use personal information (birthdays, names, addresses)
- Confirm the password by entering it again
- Click the “Activate” buttonWait 5-10 seconds for confirmation
- Verify the device status changes from “Inactive” to “Active”
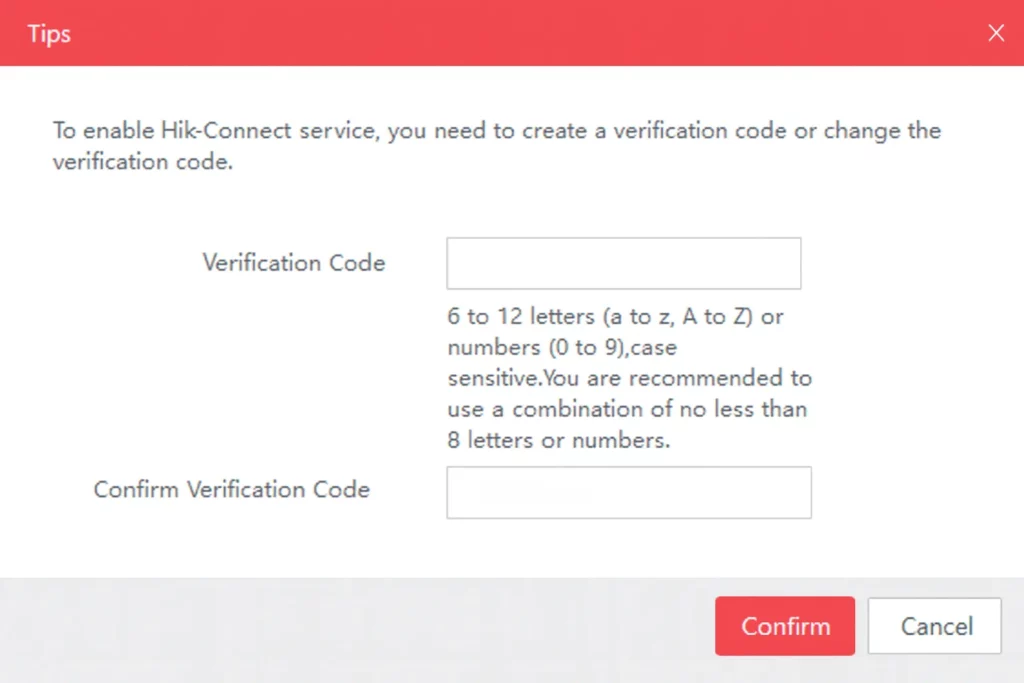
Important: Export your GUID file or set up security questions during activation. This allows password recovery if you forget credentials later.
How to Use SADP Tool to Change IP Address
Proper IP address configuration is crucial for network organization. In professional CCTV installations, static IP addresses are recommended for reliability and easier troubleshooting.
Common IP Configuration Issues:
Research shows that different network subnet errors are among the most common mistakes in security camera installations, often causing devices to become unreachable.
IP Address Modification Steps:
- Select the active device from the list
- Enter the device’s admin password in the right panel
- Choose your IP assignment method:
- Option A: Static IP (Recommended for CCTV Systems)
- IP Address: Assign within your network range (e.g., 192.168.1.201)
- Subnet Mask: Typically 255.255.255.0
- Gateway: Your router’s IP (e.g., 192.168.1.1)
- DNS Server: Use 8.8.8.8 (Google) or your ISP’s DNS
- Static IP Benefits:
- Consistent device addressing
- Easier port forwarding configuration
- Better for NVR/DVR integration
- Simplified remote access setup
- Option B: DHCP (Dynamic IP)
- Enable “DHCP” checkbox
- Router automatically assigns IP addresses
- Useful for temporary setups or simple home systems
- May cause connectivity issues if IP changes
- Option A: Static IP (Recommended for CCTV Systems)
- Click “Modify” button
- Confirm the new IP appears in the device list (may take 10-15 seconds)
- Test connectivity by double-clicking the new IP address (opens web interface)
How to Use SADP Tool for Multiple Devices at Once
When installing large CCTV systems, batch configuration saves significant time. Security professionals report that SADP Tool can reduce setup time by 80%, with the ability to activate 50 cameras in under 5 minutes.

Batch Configuration Process:
- Hold Ctrl key and click to select multiple devices
- Enable “Modify Network Parameters in Batch” option
- Configure IP range settings:
- Starting IP: First address in sequence (e.g., 192.168.1.100)
- IP Increment: Typically 1 (creates 192.168.1.100, .101, .102, etc.)
- Subnet Mask: Apply same mask to all devices (255.255.255.0)
- Gateway: Use same router IP for all devices
- Optionally enable “Enable DHCP in Batch” for automatic IP assignment
- Enter admin password (must be same for all selected devices)
- Click “Save” to apply changes
- Wait for confirmation messages
Real-World Impact: In large commercial installations with 50+ cameras, batch configuration can complete in under 5 minutes compared to 2+ hours of individual configuration.
How to Use SADP Tool to Reset Password
Password recovery is one of the most common support requests. Hikvision provides two methods depending on firmware version.
Method 1: GUID File Export (Firmware V3.3.0+)
- Select the device requiring password reset
- Click “Forgot Password” button
- Export the XML security file
- Send the file to your authorized Hikvision dealer or technical support
- Wait for password reset file (typically 1-2 business days)
- Import the reset file via SADP
- Set a new password
- Confirm successful login via web browser
Method 2: Security Questions (If Previously Configured)
If you set up security questions during activation:
- Click “Forgot Password”
- Answer security questions correctly
- Create new password immediately
- Confirm new password
Important Security Note: Without exported GUID files or security questions, password recovery requires contacting support with proof of ownership, which can delay installation by 1-2 business days.
How to Use SADP Tool When Device Is Not Detected
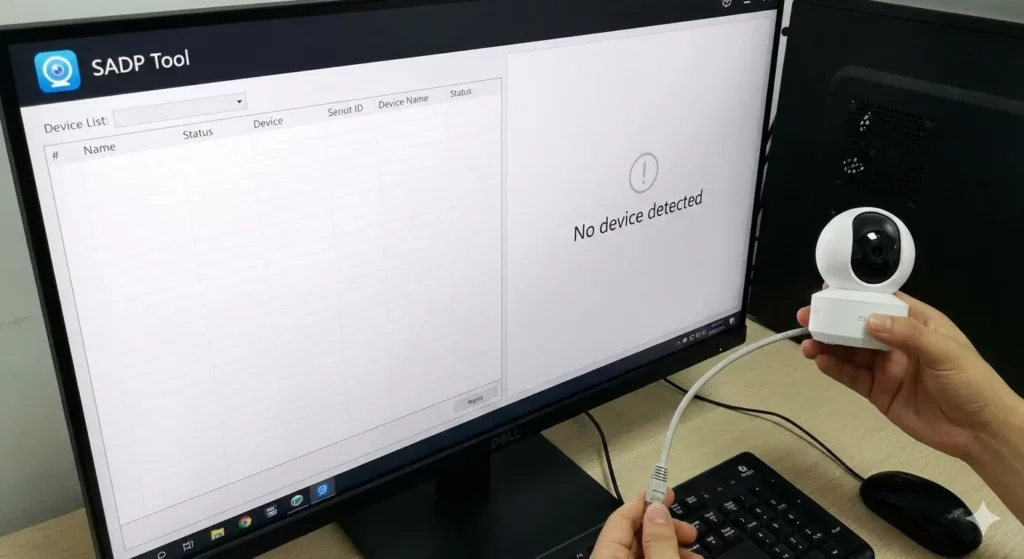
Device detection issues are common in network configurations. Here’s a systematic troubleshooting approach:
Troubleshooting Checklist:
1. Verify Network Segment
- Computer IP: Check via Command Prompt (
ipconfig) - Device default IP: Usually 192.0.0.64 or 192.168.1.64
- Both must be in same subnet (e.g., 192.168.1.x)
Network Subnet Issues: Studies show this is the #1 most common error in security camera installations, accounting for the majority of “device not found” problems.
2. Disable Firewall Temporarily
- Windows Defender Firewall
- Third-party antivirus software
- Corporate network firewalls
Firewall Impact: Security software blocking SADP is a frequent configuration issue that prevents device discovery.
3. Check Physical Connections
- Verify Ethernet cable is connected and LED lights are active
- Ensure power supply is functioning (check device LED indicators)
- Test with a different network cable if available
- Confirm PoE (Power over Ethernet) injector is working if applicable
4. Restart SADP Tool
- Close application completely
- Wait 5 seconds
- Launch as Administrator again
5. Reboot Hikvision Device
- Disconnect power for 10 seconds
- Reconnect and wait 60-90 seconds for full boot
- Device should auto-appear within 15 seconds of coming online
6. Verify WinPcap Installation According to technical forums, WinPcap is required for SADP to detect cameras across different subnets. Ensure it’s installed and active.
7. Update SADP Tool Using outdated versions can cause compatibility issues. Download the latest version from sadptool.net.
How to Use SADP Tool After IP Change
Once you’ve successfully configured your device’s IP address, accessing it properly is essential.
Post-Configuration Access:
- Open your preferred web browser (Chrome, Firefox, Edge)
- Enter the new IP address in the URL bar
- Format:
http://192.168.1.100(replace with your IP) - Include
http://prefix - Do not add www or .com
- Format:
- Login with admin credentials
- Username: admin (default)
- Password: Your activation password
- Complete initial device setup wizard
- Configure camera name and location
- Set recording schedules
- Adjust motion detection zones
- Configure network settings
- For NVR integration, add the camera using its new IP address
Browser Compatibility Note: Modern browsers work best. Avoid Internet Explorer unless required for legacy systems.
Common Mistakes When Using SADP Tool
Learning from common errors saves time and prevents security vulnerabilities. Here are the most frequent mistakes based on industry data:
1. Different Network Subnet Configuration
- Error: Computer and device on different network segments (e.g., PC on 192.168.0.x, camera on 192.168.1.x)
- Impact: Device remains invisible to SADP Tool
- Solution: Configure temporary static IP on your computer to match device subnet, or connect device to same subnet as computer
- Prevalence: This is the most common installation mistake, affecting an estimated 40% of first-time installers.
2. Weak Password Selection
- Error: Using simple passwords like “12345678” or “admin123”
- Statistics:
- 35% of users still use personal information in passwords
- 52% of Gen Z and 45% of Millennials use weak passwords
- Default passwords like “admin/admin” are exploited in majority of security breaches
- Impact: Devices vulnerable to hacking, especially when exposed to internet
- Solution: Follow NIST guidelines for strong passwords:
- 16+ characters recommended (minimum 8 required)
- Mix of uppercase, lowercase, numbers, symbols
- No personal information
- Unique password per device
3. Firewall Blocking SADP Tool
- Error: Windows Firewall or antivirus software blocks SADP network access
- Impact: No devices detected, even when physically connected
- Solution:
- Allow SADP in Windows Firewall settings
- Add exception in antivirus software
- Temporarily disable firewall for testing (re-enable after configuration)
- Industry Data: Firewall issues cause 15-20% of device detection failures in professional installations.
4. Using Outdated SADP Version
- Error: Running old versions with compatibility issues
- Impact:
- New devices not detected
- Missing security features
- Unstable performance
- Solution: Download latest version from official https://sadptool.net
5. Ignoring Device Documentation
- Error: Not checking device-specific default IP addresses
- Impact: Wasted time searching for devices with non-standard defaults
- Solution: Review device manual for:
- Default IP address
- Default credentials
- Specific activation requirements
- Firmware version information
6. Poor Cable Management
While not directly a SADP issue, messy or exposed cables are security risks:
- Easily cut, causing system failure
- Weather damage for outdoor installations
- Creates unprofessional appearance
Solution: Use conduits, cable trays, and weatherproofing connections
7. Not Documenting Configuration
- Error: Failing to record IP addresses and passwords
- Impact:
- Difficult future maintenance
- Lost credentials requiring password resets
- Time wasted locating devices
- Solution: Create an Excel spreadsheet with:
- Device name/location
- IP address
- MAC address
- Serial number
- Admin password (stored securely)
- Installation date
- Firmware version
Best Practices for Using SADP Tool
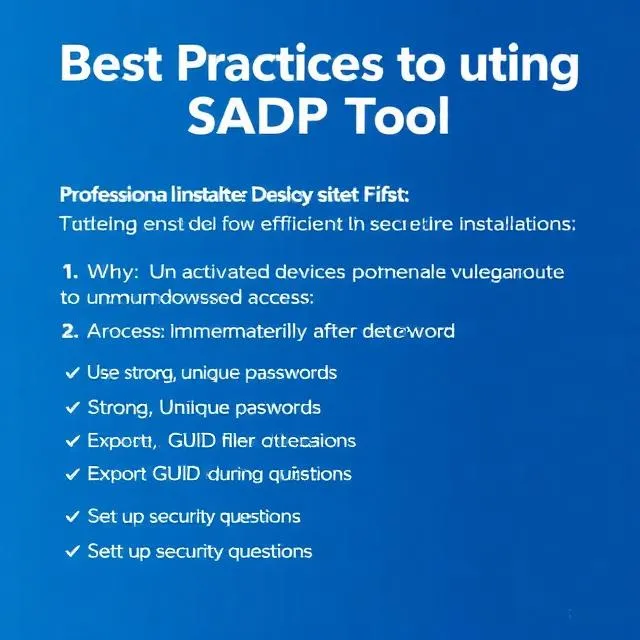
Professional installers follow these proven practices for efficient, secure installations:
1. Always Activate Devices First
Why: Unactivated devices are vulnerable to unauthorized access
Process:
- Activate immediately after detection
- Use strong, unique passwords
- Export GUID file during activation
- Set up security questions
Security Impact: Proper activation prevents the 847,522+ burglaries reported annually in the US from being aided by unsecured surveillance systems.
2. Assign Static IP Addresses for CCTV Systems
Benefits:
- Consistent device addressing
- Easier NVR/DVR integration
- Simplified troubleshooting
- Better port forwarding configuration
- Reliable remote access
Network Planning:
- Reserve IP range for cameras (e.g., 192.168.1.100-199)
- Use sequential numbering for easy identification
- Document IP scheme for reference
Professional Standard: Static IPs are mandatory in commercial installations for reliability and maintenance efficiency.
3. Label Devices After Configuration
Physical Labels:
- Attach weatherproof labels to cameras
- Include IP address and location
- Use QR codes for quick reference
Digital Documentation:
- Save device list as Excel file
- Include installation photos
- Map device locations on floor plan
- Store in shared network folder
Time Savings: Proper labeling reduces maintenance time by 60% compared to unlabeled systems.
4. Save IP Details for Future Access
Create comprehensive documentation including:
Essential Information:
- Device model and serial number
- IP address and network settings
- Admin credentials (encrypted storage)
- Installation date and firmware version
- Warranty information
- Technical support contacts
Storage Methods:
- Password manager (LastPass, 1Password, Bitwarden)
- Encrypted document (BitLocker, VeraCrypt)
- Secure network share with access controls
- Physical safe for backup documentation
5. Implement Network Security Measures
Critical Security Steps:
- Change all default passwords immediately
- Update firmware regularly
- Disable UPnP (Universal Plug and Play) if not needed
- Enable HTTPS for web interface access
- Use VPN for remote access instead of port forwarding
- Segment CCTV network from main business network
- Enable device encryption when available
Cybersecurity Context: The video surveillance market faces increasing threats, with IP cameras being vulnerable entry points for network attacks if not properly secured.
6. Regular Maintenance Schedule
Weekly:
- Check device online status
- Verify recording functionality
- Clean camera lenses (physical check)
Monthly:
- Review system logs for errors
- Check available storage space
- Verify motion detection zones
- Test remote access functionality
Quarterly:
- Check for firmware updates
- Review password security
- Audit user access permissions
- Update documentation
Annually:
- Full system review
- Replace aging hardware
- Re-evaluate security policies
- Professional security audit
7. Use Batch Configuration Wisely
When to Use Batch Config:
- Multiple devices with similar settings
- Large installations (10+ cameras)
- Identical security requirements
When to Configure Individually:
- Mixed device types (dome, bullet, PTZ)
- Different security zones
- Varying resolution/quality requirements
- Specialized camera functions
8. Test After Configuration
Verification Steps:
- Access web interface via new IP
- Verify live view functionality
- Test recording to NVR/DVR
- Check motion detection triggers
- Confirm remote access (if required)
- Test night vision/IR functionality
- Verify audio (if applicable)
Quality Assurance: Professional installers spend 10-15 minutes per camera on post-configuration testing to ensure reliability.
Frequently Asked Questions
Can I use SADP Tool without internet?
Yes, absolutely. SADP Tool works entirely on your Local Area Network (LAN) and does not require internet connectivity. It only needs:
- Network connection between your PC and Hikvision devices
- Same network segment access
- Proper firewall permissions
Internet is only needed for:
- Downloading SADP Tool initially
- Accessing remote support for password resets
- Checking for software updates
Do I need to activate device before changing IP?
No, but it’s highly recommended. Here’s why:
Technical Capability:
- You can change IP addresses of inactive devices
- Network parameters are accessible without activation
Best Practice Reasons:
- Security vulnerability if left inactive
- Prevents unauthorized activation by others
- Ensures proper access control from the start
- Required for web interface access
Recommended Sequence:
- Detect device with SADP Tool
- Activate with strong password
- Change IP address to match network scheme
- Test web interface access
- Configure additional settings
Why does SADP Tool show device as inactive?
Devices show as “Inactive” for several reasons:
1. First-Time Connection
- New devices with firmware V3.3.0+ (DVRs) or V5.3.0+ (cameras)
- Security feature requiring initial activation
- Solution: Activate via SADP Tool with strong password
2. Factory Reset
- Device returned to default settings
- Activation status cleared
- Solution: Reactivate as if new device
3. Firmware Upgrade
- Some firmware updates reset activation status
- Rare but possible occurrence
- Solution: Reactivate with existing or new password
4. Authentication Failure
- Incorrect password entered multiple times
- Security lockout triggered
- Solution: Wait 30 minutes, then retry or reset password
Important: Never leave devices inactive for extended periods. The video surveillance industry has seen a 37% increase in IoT device compromises, with unactivated cameras being prime targets.
Can SADP Tool configure cameras remotely?
No, SADP Tool only works on the local network. Here’s what you need to know:
Local Network Only:
- Must be connected to same LAN as devices
- Cannot configure devices over internet
- No remote access functionality built-in
Remote Configuration Alternatives:
- Hik-Connect App
- Mobile app for remote access
- Cloud-based device management
- Requires initial local setup
- VPN Access
- Connect to local network remotely
- Use SADP Tool as if physically present
- Most secure remote option
- Web Interface
- Access individual cameras via browser
- Requires port forwarding or VPN
- Limited bulk configuration
- HiTools Delivery Software
- Professional tool with remote capabilities
- Batch operations support
- Requires additional licensing
Professional Installations: Technicians typically complete initial configuration locally with SADP Tool, then set up remote access solutions for client maintenance.
Is SADP Tool required after initial setup?
Not required, but highly valuable. Here’s when you’ll need it:
Initial Setup Phase (Essential):
- Device activation
- IP address configuration
- Network troubleshooting
- Batch device configuration
Ongoing Use Cases:
- Network reconfiguration
- Adding new devices to existing systems
- Troubleshooting connectivity issues
- Password resets (GUID file export)
- Firmware verification
- Device inventory management
Alternative Access Methods: After initial setup, you can manage devices through:
- Web browser interface (individual devices)
- NVR/DVR interface (connected cameras)
- Mobile apps (Hik-Connect, iVMS-4500)
- Video management software
Professional Recommendation: Keep SADP Tool installed even after setup completion. IT professionals report using it for ongoing maintenance and troubleshooting approximately monthly in commercial installations.
Advanced Tips and Statistics
Industry Benchmark Data
Video Surveillance Market Growth:
- 2024 Market Size: $54.42 billion
- 2030 Projected Size: $88.71 billion
- CAGR: 12.1% growth rate (2025-2030)
- IP Camera Market Share: 65% of total surveillance cameras
Hikvision Market Position:
- Global Market Share: 23% (2024)
- JVSG Rating: 27.3% (2025)
- Device Penetration: 100+ million devices worldwide
- Regional Strength: 22.1% in Europe, lower in North America due to NDAA restrictions
Installation Statistics:
- Time Savings: SADP Tool reduces setup time by 80%
- Batch Efficiency: Configure 50+ cameras in 5 minutes
- Common Errors: Subnet issues affect 40% of first-time installers
- Firewall Problems: Cause 15-20% of detection failures
Password Security in Surveillance
Current Threat Landscape:
- Weak Passwords: Used by 35% of users
- Password Reuse: 73% of users share work/personal passwords
- Young User Risk: 52% of Gen Z use weak passwords
- Breach Statistics: Over 1 million burglaries annually in the US
Security Best Practices:
- Minimum Length: 16 characters (NIST recommendation)
- Complexity: Mix of 3+ character types
- Uniqueness: Different password per device
- Management: Use encrypted password managers
Network Configuration Standards
Professional Installation Practices:
- Static IP Assignment: Mandatory for commercial systems
- IP Range Planning: Reserve 192.168.1.100-199 for cameras
- Documentation: Required for 100% of professional installations
- Testing Time: 10-15 minutes per camera verification
Conclusion
SADP Tool is an indispensable utility in the $54 billion video surveillance industry, streamlining the configuration of millions of Hikvision devices worldwide. By following this comprehensive guide, you can:
- Detect devices in 15 seconds with automatic scanning
- Activate cameras securely with strong passwords
- Configure IP addresses efficiently for network integration
- Manage multiple devices simultaneously with batch operations
- Troubleshoot effectively using systematic approaches
- Maintain security through proper password management
Remember these critical statistics:
- SADP Tool saves 80% of configuration time
- Subnet errors cause 40% of detection issues
- Strong passwords (16+ characters) protect against the 35% of users still using weak credentials
- Static IP assignment is professional standard for the 65% of IP camera installations
Whether you’re installing a single camera for home security or deploying a 50-camera commercial system, SADP Tool provides the foundation for reliable, secure surveillance network configuration.
Take Action Now:
- Download the latest SADP Tool version from https://sadptool.net.
- Document your network configuration plan
- Use strong, unique passwords for all device activations
- Save your IP address documentation in a secure location
- Schedule regular system maintenance checks
By implementing these best practices, you’ll join the thousands of security professionals worldwide who rely on SADP Tool for efficient, secure surveillance system management.