sadp basics
Install SADP on Windows 10 (Hikvision)
Install Hikvision SADP on Windows 10: official download, Run as administrator, Npcap, firewall allowances, and fixes when SADP won’t detect devices.

Many installers struggle the first time they try to find Hikvision cameras or recorders on a LAN. SADP (Search Active Device Protocol) is the standard desktop tool for discovery, activation, IP edits, and supported recovery flows. This guide walks through installing SADP on Windows 10 (and the same steps generally apply to Windows 11).
Downloads: Our download page provides SADP.zip for Windows and links to HiTools for verification. For download safety context, see Where to download SADP safely (HiTools).
Table of contents
Why do you need SADP tool?
SADP is a free utility from Hikvision (via HiTools) that helps you:
- Discover IP cameras, NVRs, and DVRs on the local network
- Activate new devices
- Change network parameters (where the UI allows)
- Run supported password workflows where the device and firmware permit
Learning a clean install path saves time on every job. For day-to-day use after install, see How to use SADP.
System requirements for SADP on Windows 10
Requirements are modest for most PCs.
Hardware requirements
- CPU: Modern x86/x64 processor (older guidance often cited ~Pentium-class minimum; any recent PC is fine)
- RAM: 1 GB minimum; 2 GB+ recommended if other apps are open
- Display: 1024×768 or higher
- Network: Ethernet strongly preferred for reliable discovery (Wi‑Fi can work when everything shares the same L2 broadcast domain, but wired is easier to troubleshoot)
Software requirements
- OS: Windows 10 (64-bit is typical today; 32-bit may still appear on legacy HiTools builds—match the installer to your OS)
- Packet capture: Npcap (or legacy WinPcap on very old bundles)—often offered during the SADP installer
- Rights: Administrator for install and usually for normal SADP use (raw capture needs elevation)
How to download SADP tool
- Open Hikvision’s HiTools listing for your region (start from the download page linked under Downloads above).
- Download the Windows package that matches your architecture and OS.
- If you receive a ZIP, extract it before running the installer.
- Prefer verifying file name, size, and publisher in SmartScreen / Properties before running.
For “no devices” after a good install, see SADP not finding cameras and Windows Firewall blocking SADP.
Step-by-step SADP installation process
Step 1: Run as administrator
Right-click the SADP installer → Run as administrator. This allows Npcap integration and firewall rules the tool may register.

Step 2: Accept license agreement
Read the Materials License Agreement and related prompts, then accept to continue.
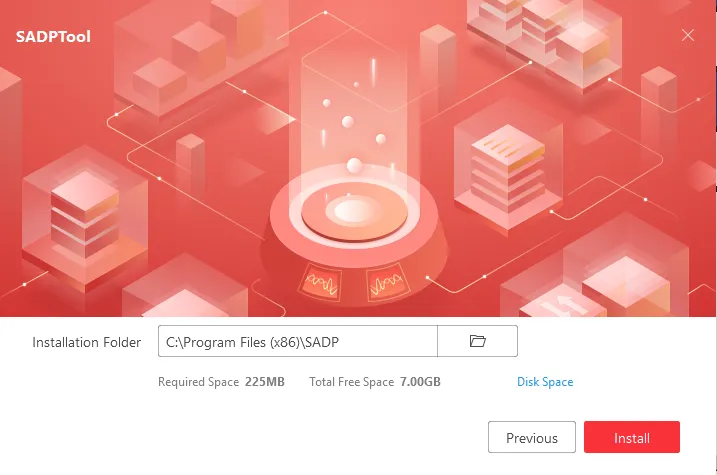
Step 3: Choose installation directory
The default path is fine for most users; change it only if your IT policy requires a specific drive or folder.
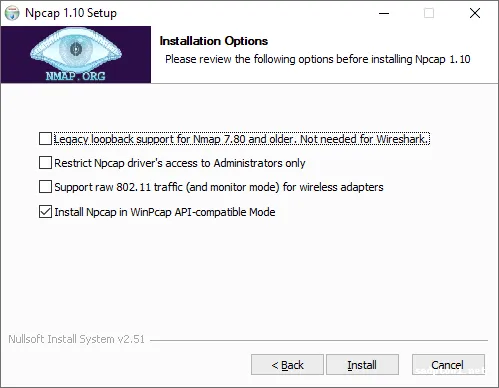
Step 4: Install Npcap component
When the wizard offers Npcap (or similar), allow it. Npcap provides the packet capture APIs SADP uses for network scanning. Keep defaults unless your security team documents otherwise; WinPcap compatibility options exist on the Npcap installer for edge cases.
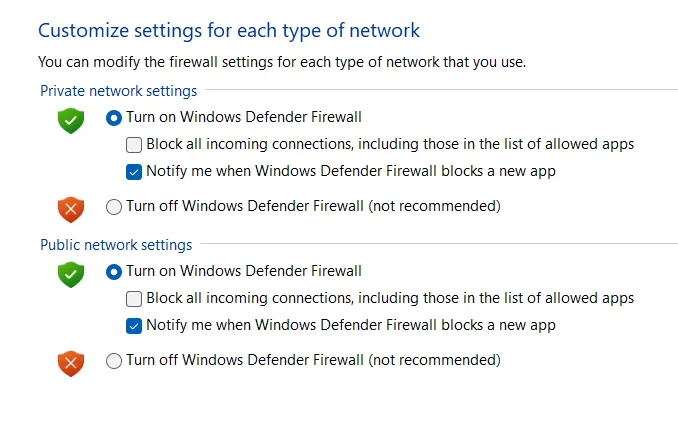
Step 5: Configure Windows Firewall
If Windows Defender Firewall asks whether to allow SADP (or the installer’s helper), choose Allow on Private networks at minimum for discovery on your CCTV VLAN. Blocking here is a common reason lists stay empty—see the firewall article linked in the troubleshooting note above.
Step 6: Complete installation
Finish the wizard. A desktop shortcut may be created—use Run as administrator when launching if discovery fails without it.
Post-installation best practices
- Pause VPN while scanning the local subnet (split tunneling still breaks many discovery paths)—VPN and SADP.
- Update NIC drivers if Npcap or SADP behaves oddly after OS upgrades.
- Prefer wired Ethernet to the same switch / VLAN as the cameras for first discovery.
Troubleshooting common SADP problems on Windows 10
SADP won’t open or crashes on launch
- Always Run as administrator.
- Add an antivirus / EDR exception for the install folder if quarantine is suspected.
- Try Compatibility settings (Properties → Compatibility) if Hikvision documents a known workaround for your build.
- Repair or reinstall Npcap from Npcap if capture init fails.
No devices detected (most common)
Primary checks
- Test with firewall temporarily relaxed on Private profile (then tighten with explicit rules).
- Exit VPN clients completely.
- Confirm the PC and cameras are on the same subnet / VLAN for broadcast discovery.
- In SADP, pick the correct network adapter if the UI exposes adapter selection.
- Switch to wired Ethernet if you are on Wi‑Fi.
Advanced checks
- Power and link lights on cameras and switch ports.
- Same L2 domain (no routed discovery across routers without additional setup).
- Reboot switch / PoE injectors and retry Refresh in SADP.
Npcap installation errors
- Install the latest Npcap from npcap.com as administrator.
- Remove old WinPcap first if both are present and conflicting.
- Enable WinPcap compatibility mode in Npcap if an old dependency still expects it.
SADP freezes or becomes unresponsive
- Close SADP and reopen as administrator.
- Install Windows updates and retry.
- Free RAM / close heavy browsers during large scans.
- Compatibility mode is a last resort if Hikvision or IT support recommends it for a specific build.
Frequently asked questions about SADP
Is SADP compatible with Windows 10?
Yes. Use the Windows 10/11 build from HiTools with Npcap working.
Why can’t SADP detect my Hikvision cameras?
Usually firewall, VPN, wrong adapter, VLAN/subnet, or Wi‑Fi path issues. Work through the “SADP not finding cameras” article linked earlier on this page.
Do I need Npcap or WinPcap?
Yes—SADP needs a packet capture stack. Npcap is the current default bundled path; WinPcap is legacy.
Is SADP free?
Yes, as part of Hikvision’s tooling for eligible use from official sources.
Do I always need administrator rights?
Typically yes for reliable operation; plan for admin on installer machines used for commissioning.
What if SADP freezes during installation?
Retry after Windows updates; run the installer as administrator; temporarily disable aggressive AV only per policy; use compatibility mode if support advises.
Can I use SADP on Windows 11?
Yes—same general flow as Windows 10 with a supported HiTools build.
Does SADP work over Wi-Fi?
Sometimes, when the laptop truly shares the same L2 as devices. Ethernet is more predictable.
What’s the latest version of SADP?
Version numbers change often. Check the HiTools page at download time and record the build in your internal docs.
How long does network scanning take?
Often seconds on a quiet LAN; large subnets or slow links take longer. Use Refresh after physical changes.
Conclusion
Installing SADP on Windows 10 is straightforward when you use official packages, Run as administrator, complete Npcap, and allow local discovery through the firewall. Prefer wired connections for first-time discovery, then keep SADP updated via HiTools as you standardise new site images.
Next steps: SADP download (linked under Downloads above) · How to use SADP (linked earlier on this page) · Change IP with SADP · Mobile / app context
Related guides
- SADP official download (HiTools)—linked under Downloads above
- Windows Firewall blocking SADP—linked earlier in this guide
- SADP not finding cameras—linked earlier in this guide
- Multicast / UDP (plain language)
More on SADP Tool
More articles
- How to Activate a Hikvision IP Camera
Use SADP from HiTools on your LAN to find inactive Hikvision cameras, set an admin password, verify in a browser, then tune IP and security.
- How to Activate Hikvision NVR Step by Step
Activate a Hikvision NVR with SADP: find Inactive, set password & IP, browser login, live view, add cameras on a switch.
- Change camera & NVR IPs with SADP
Change Hikvision camera and NVR IPs with SADP: requirements, step-by-step Modify workflow, DHCP off, verification, common fixes, best practices, and FAQs.
- How to Set Up and Activate a Hikvision DVR
SADP finds inactive Hikvision DVRs on the LAN: activate with a strong password, set IP/DHCP, use the web UI & optional Hik-Connect.